Ta! Da! And now you can see what the blue yarn in the salad spinner became.
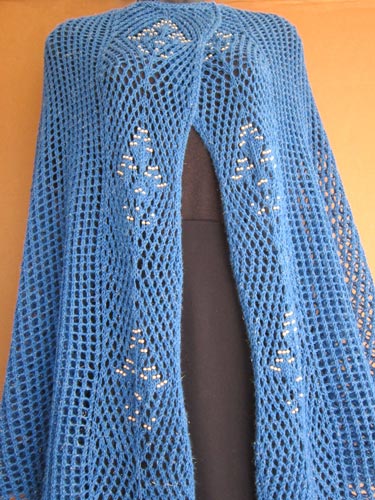
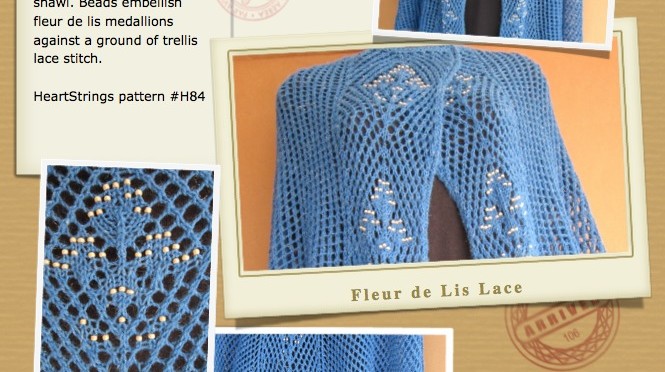
It’s my newest design Fleur de Lis Lace Cape. Continue reading The story behind designing Fleur de Lis Lace Cape

Ta! Da! And now you can see what the blue yarn in the salad spinner became.
It’s my newest design Fleur de Lis Lace Cape. Continue reading The story behind designing Fleur de Lis Lace Cape
Sorry I have been gone so long from this blog. I have a BUNCH of stuff to share with you about things I’ve been doing in the studio, in the kitchen, in the garden … and … aah well, when I get behind like this, I just have to start somewhere. So it seems easiest to begin with what’s going on right now.
Finished knitting a shawl and getting ready to block it. Unicorn Fibre wash and rinse is my “spa treatment” for yarn. Makes the fibers sensuous, smell good (my hands, too! since I hand wash), and relax for the magic moment of spreading out the lace in all its beauty.
Here is the shawl afterwards in the salad spinner that I designate for fiber stuff (i.e. this salad spinner is ONLY used for fiber stuff; never used for food). A salad spinner is a gentle, yet efficient and “green” way to extract water, thus reducing drying time after the shawl is laid out for blocking.

Do you have a favorite spa treatment for yarn?
p.s. I can’t wait to share more details with you about this new shawl design. More on that soon.
Here is a photo journey of a Navajo Rug that John purchased and I repaired for him a while back. I am finally getting these posted to my blog!
Churro is the traditional wool used in authentic Navajo woven rugs. Thus, I chose Churro as my fiber for the repair. This, along with quality repair technique, is vital for retaining the rug’s value.
Notice the Storm Pattern with distinctive backwards “E” in center. We still have not tracked down the meaning of the distinctive backwards “E” in center. This is an unusual feature for Navajo rugs of this style. Anybody have any ideas?
This rug is now a wall hanging in his new “museum”. Next time I visit him, I will take pictures so you can see the rug in its new home.
Over at the KnitHeartStrings.com learn-and-knit-along site for Bits of Lace July 2012, we have been working on a beaded lace edging ornament. This project uses the “slip/slide a bead into place between stitches” method which requires that the beads to be strung onto your yarn/thread before knitting with the beads.
The pattern for Antique Satin and Lace Ornament that we are using (free for Bits of Lace members through the end of July 2012) briefly explains preparation instructions for both loose and pre-strung beads.
By pre-strung beads, I mean tiny beads that you buy in a hank that are strung on a temporary thread.

Actually, I seldom use pre-strung beads because I prefer to use and sell the high-quality Japanese beads that only come loose. But for craft-type items that are not going to be washed and/or take a lot of wear (like this month’s ball ornament project), if you have pre-strung beads, it is fine to use them. You can take advantage of the beads already being strung on temporary thread, and just transfer whatever quantity of pre-strung beads you need to the yarn/thread with which you will be knitting.
Here are step-by-step visuals to show you how I do this —
Begin by pulling the end on only one of the strands of beads loose from the knotted bundle, leaving the other ends still secured.

For most hanks, I’ve found that pulling a strand loose is easy to do, but some others are stubborn and I have to cut the strand near the knot and remove a few beads before proceeding.
You are going to need some space to make a knotted loop that will act as a “string needle eye” during the transfer. I do this one of 2 ways:
Option 1. While leaving the other end of the bead strand still secured in the bundled knot, remove a few beads as necessary to make space on the string to form a knotted loop. You can always re-string these loose beads later if you want. (Personally, I just toss the few stray beads like this in a pretty glass container that I keep on my bookshelf. One day I might do some kind of ad hoc project with the mixture I’ve been collecting, but for now I am just enjoying all the bead colors and sizes coming together like a serendipitous piece of art.)

Option 2. Clamp the first end you pulled loose, then pull the other end of that same strand free of the knotted bundle. By clamping one end tightly, you can move the beads toward the clamp without fear of them falling off the string, and gain an extra inch or two of space overall on the string — usually enough so that the space at the other end of the string is now enough that you don’t have to remove any beads.

Tie a compact, tidy overhand knot, leaving an open loop that will serve as the “eye” of the string needle. The eye does not have to be very big — just big enough so that you can get your yarn/thread through it. But it doesn’t hurt to be larger than you actually need either, because then it is easier for the next step.

Now insert your project yarn/thread through the knotted loop and pull through enough of a tail so that there is no fear of it coming out during the subsequent transfer of beads.

Slide some beads over the knotted loop …

… and onto the project yarn/thread.

Continue sliding beads from the pre-strung thread onto your project yarn/thread until all beads on the strand are transferred or as many as wanted.


Then remove the project yarn/thread from the knotted loop, and you are ready to knit with your strung beads.
In some cases you may need more beads than on a single pre-strung strand. In this case, you can repeat the steps above with as many strands of pre-strung beads as needed.
In some cases, you will have remaining beads on the pre-strung strand that you don’t need right now. So you will want to secure the temporary thread in a way so that the remaining beads don’t fall off. This is what I like to do —


If you’ve pulled the other end of the strand loose from the knotted hank, make a bead stopper at that end, too, so the beads don’t fall off.

Hope you’ve enjoyed this little photo tutorial and learned a thing or two along the way.
Interested in some more knitting with bead tips and techniques? Check out other bead information resources I’ve prepared.
Happy knitting and beading!
Have you acquired some seed beads and you are not sure if they are the size you need for a HeartStrings pattern? You don’t need fancy tools, calipers or such, to find out. As a knitter, it is likely that you already have a knitting needle gauge. That’s all you need for determining what size beads you have. Here’s how —
Using your knitting needle gauge, find the closest hole that matches one of your round beads as shown in the following picture. The mm sizing on your knitting needle gauge is either exactly, or close to, the diameter of the beads you have. In this picture, I demonstrate with 3 different size beads that are commonly used in HeartStrings beaded knitting patterns.

Looking at the largest to the smallest of the 3 beads in the picture, we have these diameters (and I’ll also go ahead and give you an alternative common specification that you are likely to see when shopping for beads):
I hope this helps you confidently proceed with using beads you have on hand, or when shopping to know what you are getting.
In case you had not seen yet, here are also some of my other bead information resources, such as estimates of number of beads per gram (really helpful since almost all beads are sold by grams rather than number of beads).
Happy knitting and beading!
p.s. If you love sheep-y things as much as I do, you’ll love seeing this cute Sheep Needle Gauge designed by Susan Pine, the Elegant Knitter at Goose Pond.
