Counteracting a throw-away society
Considering the time and expense of making hand-knit socks, it is well worth the effort to repair them if you eventually wear through a hole. You say you don’t know how to darn a sock? Let me help with these photos and brief explanation of steps for the method I use to to repair a sock with a knit-in-place patch.
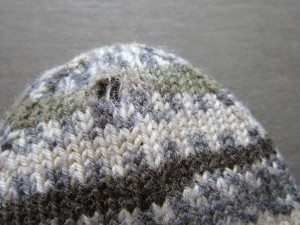
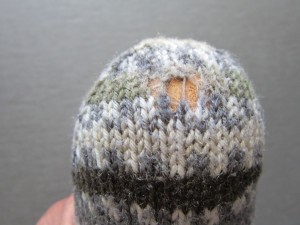
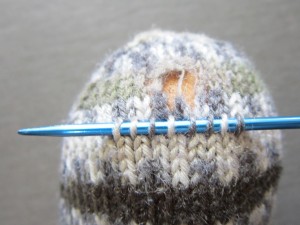
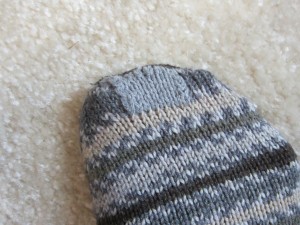
Although I usually get years of wear from my hand-knit socks, I am especially hard on the toes of socks because I have such a difficult time keeping my toenails short enough. But eventually, the inevitable happens (the pair of socks I photographed below to show are over 10 years old) and the yarn will wear thin and develop a hole.
I could remove the toe area totally, and re-knit it. But I am going to show you how to darn this sock with a knit-in-place patch. This method is handy to know, because it also works well for repairing socks with wear areas in other places like the ball of the foot and heel.
Note: In the photos below, the socks from the pair I am repairing are slightly different (this is one of those self-patterning yarns that was popular in the early 90’s). I wanted to get the best photo for each major step in the process, and so sometimes the photo was of one of the socks, and sometimes the other.
Making a knit-in-place patch
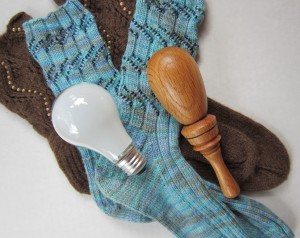
1. Place a darning egg in the sock.
Don’t have a fancy sock darning egg? An old-fashioned incandescent light bulb works, too. (The light bulb doesn’t even have to work any longer, so think of this as another way of using something that you might otherwise throw away, lol.)
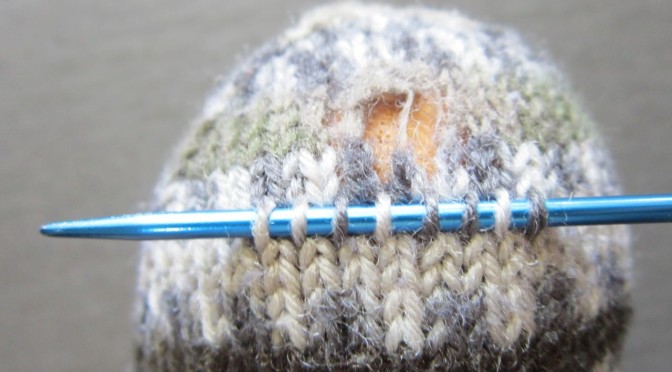
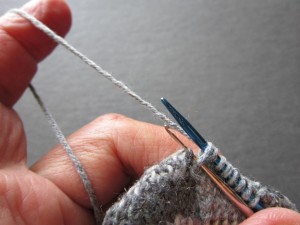
2. Onto a short double-point knitting needle in same size as used to knit the sock, pick up the loops of stitches in an undamaged row below the hole.
Remove the darning egg temporarily.
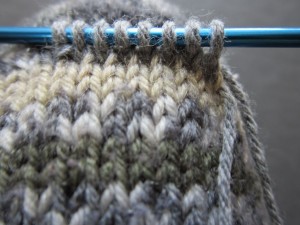
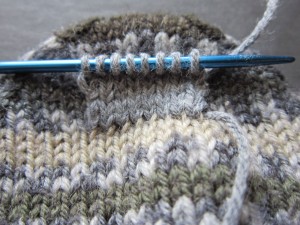
3. Using yarn in a similar weight as the sock, knit across the row of stitches on the needle, then purl back across the row. If you happen to have some of the original yarn leftover from making the sock, all the better. But if you are like me, you won’t be able to find it after 10 years or so, lol. A yarn in a coordinating color, or even a bright contrasting color, is fine to use. The patch is likely not going to be seen when worn anyway, and if it is, a bright-colored patch could be quite fun. The important thing is that you want the yarn used for the repair patch to be a comparable weight (and of course sturdy enough so that it holds up to wear for another 10 years or so again <g>).
4. Now you want to continue to knit back and forth to make a square or rectangular patch to cover the hole. At the same time, attach the patch to the original sock at the beginning and end of each knit row as follows:
k2tog the first stitch of the row with a stitch loop of the original sock 2 rows above, k until one st remains in row, ssk the last stitch of the row with a stitch loop of the original sock 2 rows above.
Tip: If you have difficulty picking up the stitch loop of the original sock to incorporate into the k2tog/ssk attachment at either end, you can use a crochet hook to assist pulling the loop onto the knitting needle.
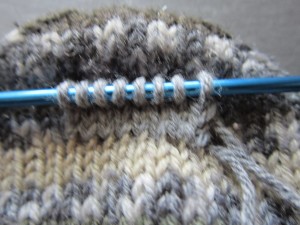
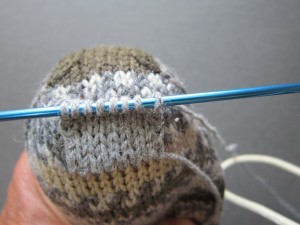
5. Continue knitting back and forth on the patch until it covers and hole entirely and you have completed a purl row. Cut yarn, leaving a long enough tail to graft the stitches of the patch to the original sock.
6. Insert darning egg into the sock again. This will give a good foundation for grafting the stitches and assure that you don’t catch any of the underside of the sock when sewing.
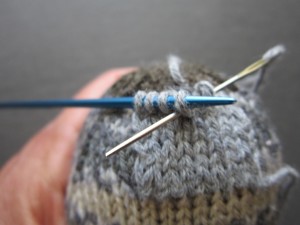
7. Thread a tapestry needle with the yarn tail and begin grafting the undamaged row of stitches above the hole to the live stitches on the knitting needle.
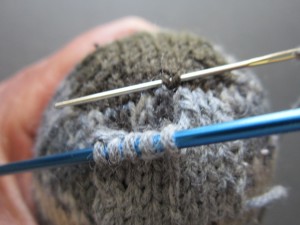 Continue grafting until all live stitches have been removed from the knitting needle and are now attached to the sock.
8. Remove darning egg. Bring yarn ends to inside of sock. Turn sock inside out. Insert darning egg into the sock again temporarily, and weave in yarn ends invisibly. (I always like to insert a darning egg for weaving in ends on toes of socks, so I don’t mistakenly catch the underside layer of the sock! — you probably don’t need to ask me why, lol)
The repaired sock with the completed patch
I’ve already been wearing these socks for 4 months and they are holding up great. It makes me feel good about giving new life to an old friend (my socks, that is).

Best sock repair technique ever! I have a similar problem with the toes of my socks – my big toes tilt upwards somewhat and I invariably wear holes in the toes of my socks (though socks knit with superwash sock yarn seem to last a really long time before that happens) and sometimes the toes of my sneakers if the upper is made of nylon. Thanks very much for sharing this great technique.
Thank you so much for sharing this technique. I am a beginner to repairing knitting pieces and it was easy for me to understand how to do.
Jackie! Thank you thank you! I have 8 pair of hand knit socks made by my sister Eileen and my friend Linda. All with holes in the heels! Thanks to you they are all wearable again! I couldn’t throw them away and they were all languishing in my sock drawer. Thank you so much!
Thank you for this tutorial. I have a sweater that’s much loved and must have tasted delicious just waiting for this technique! Wherever possible I try to avoid the creation of holes by reinforcing the heel and toe as I knit. Since it is nearly impossible to find the little skeins of reinforcing yarn that used to come with sock yarn up until the 1950’s or so, I’vè had great luck using rayon sewing machine embroidery thread. Not polyester because it will cut through the yarn. The kind I use is a very fine multi stranded thread. I still have my first pair of socks, knit close to 20 years ago. granted, I now live where Winters are short, but chilly and damp some wool socks are my choice daily. So far, so good. (I don’t miss the snow!!)
Thank you! Learning how to repair socks was on my bucket list for this year and I’ll just be able to squeak it in before Dec 31. Great tutorial!
Awesome instructions. Thank You.
You are welcome! Thank YOU for your kind words.
This is great! I tried repairing a just knit sock that my dog got a hold of. It was my first ever sock. So bummed, I stored the project til just now. I, excited to finish the foot of the 2nd sock now. I, too, have a box of smart wool socks with holes. Thank you from Michigan 1/2019!
Wonderful. Glad it helped you make that repair and enjoy your first ever socks!
Love this idea I ware my heels and ball of the foot right off thanks to berber carpeting sharp fibers and I am a sock walker. Thanks so much.
Very clever. I was looking for a way to repair my knitted hat done in the round, my precious doggie got hold of, so I’m tempted to try this method.
Do you only attach to the sock at the end of the knit row or do you attach at the end of every row, both knit and purl?
Thank you for sharing such a helpful tutorial. I think this is my favorite method!
Micha
Oops! Just went over the instructions again and I see that it’s at the end of every knit row.
🙂
You’ll attach at the beginning and end of each knit row, as per the instructions.
I didn’t notice at first who had written the article. I just glanced at the pics and thought,” Oh they’ve knit a pair of Jackie E S’s beaded socks.!”. Then I got to the end and saw it WAS Jackie E. S. Thanks for the great article, and thanks again for the great sock pattern. I’ve knit several pair!
Thanks for this. Fantastic. Any reason one couldn’t/shouldn’t make a second layer on sole of sock in this manner when completing the socks??
You could. But then you would have a large area of fabric rubbing on fabric, which could either eventually bunch up and be uncomfortable, or even cause the sole to wear out more quickly. If you want a good-wearing double-thick sole, would be better to knit a cushioned sole using the padded slip-stitch technique as seen in the pattern for “A Bit-O-Lace Sport Footies” http://www.heartstringsfiberarts.com/a83.shtm
i can see why it wouldn’t work on “new” socks but would it work on the heels that may not yet have holes but are pretty thin and may have a hole in the next wearing?
Yes, this technique will also work in any situation where you want extra reinforcement. Select a thin enough (yet strong) thread/yarn so as to not result in too much bulk to be comfortable when wearing (e.g. in your shoes/boots).
In this situation, I think I’d use duplicate stitch to reinforce the thin area.
You can use duplicate stitch to reinforce thinning areas on hand-knit socks BEFORE a hole actually appears. Similar principle, but using a yarn needle and one strand of the same weight of yarn the sock was knit from.
Great tutorial! Thanks! Question: what sock yarn are you using that lasts ten years before wearing through? Mine usually last just a couple years before thinning.
You are so interesting! I do not suppose I’ve read through something like this before.
So great to discover somebody with a few genuine thoughts on this subject.
Really.. many thanks for starting this up. This website is something that is required on the
web, someone with a bit of originality!
Perfect, I went outside and darned a pair of socks I’ve been keeping in storage due to two large holes in them. I can’t wait to wear them to see if it can be felt while wearing. If not, then I will definitely be mending my hand knit socks from now on!
Do you/can you sew around the hole first ?
I have a machine made kids sweater with holes under each arm and I think this would work but the yarn is not “felted “and the sts will unravel ????
You could try ironing a thin piece of knit on the back, like an old t-shirt or thin jersey knit, using wonder under to hold the patch in place and secure the loose ends.
Since you catch all the stitches in the healthy row, it should unravel past that, I have used this technique on socks and hats, big holes and small. It works great!
*Should not…
Thank you so much for this – my feet are all cozy in my nearly repaired socks … and I am going to use this to patch over some boo boos in other knitted items for that ‘shabby chic’ effect : )
Such a great method for sock mending! Used it right away.
You could also use it add pockets to a garment, like a cardigan. Only leave omit the final step of grafting and the top margin open. An i-cord edge could be added for neatness.
Thank you so much! K.
Thank you so much for that pocket idea! I have knitted a cardigan that I miss having pockets on. I even have enough yarn left over to knit them! 🙂
Awesome. Put in stitch two rows above what? The row where you picked up th very first stitch row? Thx
The stitch column 2 rows above the end of the row where you have most recently attached to the sock. If you look at the enlargements of the photos, you might be able to see this better than to explain in words.
This is THE best system I have ever used. THANK YOU VERY MUCH.
Following your tutorial to mend some of my Smartwool socks right now! Thanks for the instructions!
Well, I pinned this on Pinterest the other day and tried it out today – it worked so well I repaired a second pair right away – they look so nice that I will use this method with all my socks now. Thanks for the explanation!
That is fantastic! Glad the sock repair tutorial helped you bring new life to socks.
I think it would be a good idea to remind your readers that diabetics should have smooth socks to protect their feet, since the feet of diabetics are very sensitive and can develop sores very easily. Handknit socks with natural oils are very helpful to diabetics.
Another year later your post isn’t less popular! Thanks! I love not throwing away all that we call our own and this is a perfect way to help me in my opinion of caring on things, especially beloved ones. If the yarn is made by 4 or 6 fades l take one of them, put it through a needle’s hole and fix the defected rows before if needed. So you don’t feel anything of being repaired. That’s it!
Thanks a lot for your great idea.
So glad you found the sock repair useful.
Best wishes for giving all your socks new life!
I’ve got a pair of wool knee high socks from when I did cross-country style skiing, that have very thin spots on the heels. This method will let me rejuvenate them
I’ve saved this tutorial in Word, but I’ve put a double-strikethrough on the word SOCK in the title. It’s a technique that can serve as well for ANY hand-knit item. I’m sorry I didn’t know how to do it when I retrieved the torn blanket I’d given my mother-in-law decades ago. It would have looked much better than the knitted patches I whip-stitched over the holes, even done in a contrasting colour.
Thanks for sharing this great idea. Sure extends the wear of the socks!
Awesome. Thank you … I’ve been looking for this info.
I’ve darned several socks, but I really like your method and will use it next time. Thanks.
Oh my gosh! You just cant believe how many pairs of socks that I have made for my family have holes. I have put them away until I could figure out how to repair them….Wow, Thank you Jackie for this toturial!!!!
This is ingenious!! I never would have thought of it myself, but it’s totally logical. Thanks for sharing our expertise.
What a great way to darn socks. Thank you!!!
what exactly do you mean by grafting the stitches on the sock with the ones on the needle? are we knitting them together?
See the pictures in step 7 with a tapestry needle.
Kitchener stitches would work great for grafting
Amazing!! I have always duplicate stitched the weak spots before they wear through, though sometimes that fails. I love this idea!!!
My mother taught me how to weave darn socks, but that was too thin to last long enough to cover the.time it took to do so. So, the last couple of years, I have just made a garter stitch patch of yarn to patch store bought socks which lasted well…BUT your skilled solution for knitting the patch on so makes sense that I’m surprised that it’s not more well known. Thanks so much!
Wow; that’s exactly where the Mister around here wears through his handknit socks. I’m so happy to have this tutorial to repair his favorites! Thank you for sharing your expertise.
thanks for the great tutorial, Jackie! I have a pretty good collection that need this treatment, though many have a heel, rather than a toe problem 🙂
How did you know this was exactly what I needed today. thanks so very, very much