All posts by Jackie E-S

Jackie E-S is the owner of HeartStrings FiberArts, a showcase for her growing roster of original pattern designs. As a certified master knitter and teacher, Jackie continues to share her love of knitting and knowledge through design and publication of skill-building pattern instructions, and conducting workshops, programs and demonstrations. Her interest in the fiber arts extends beyond knitting and spinning to include weaving, dyeing and all needle arts. She also enjoys contract bridge and music.

Bobbe’s Garden and the Purple Hyacinth Bean Vine

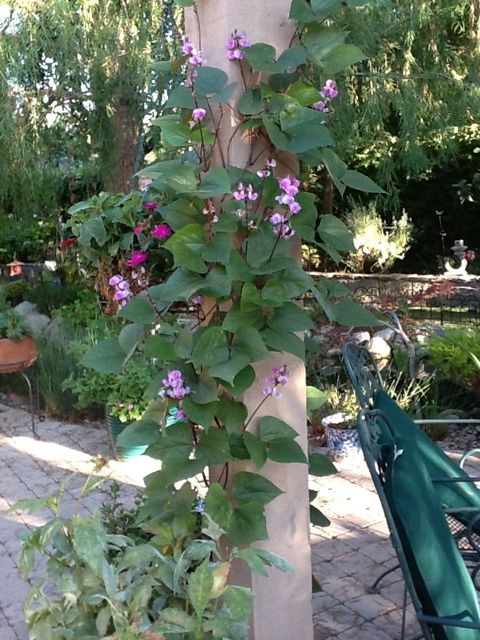
Do you remember the Jackie and the Beanstalk Magic Seed Packets I offered last April for free with orders of Kits or Yarn in the HeartStrings Shopatron store? Several people took me up on that offer to receive some purple hyacinth bean vine seeds (sometimes also called Egyptian Bean and several other names I have since come across) .

I’d been wondering the last few days who actually planted the seeds and how they were doing. It’s about that time of the year when even those with later planting season should now be starting to see pretty flowers and maybe even some  brilliant purple pods forming.

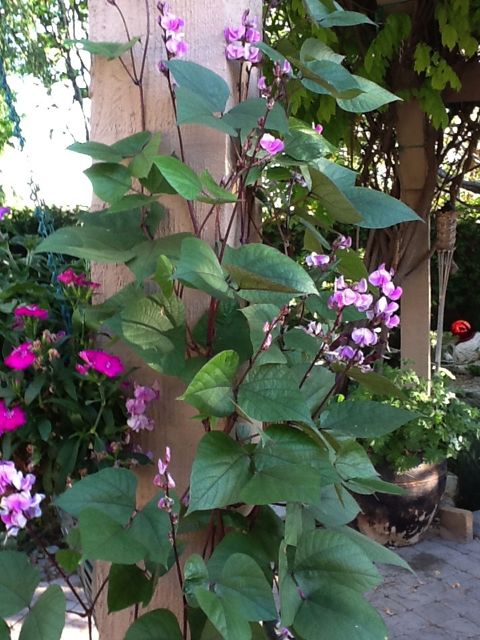
A lovely person, Bobbe J, apparently intercepted my thought waves. Because this weekend I received photos to enjoy and given permission to share. Bobbe is not only an avid knitter, but obviously has a green thumb as well as doing outstanding photography.  Here is what she said:

“The vine is so wonderful … The flowers are fantastic and the beans are just coming.  NO EAT BEANS. Wonderful plant thank you for sharing.”

Purple Hyacinth Bean Vine in Bobbe's garden - photo credit Bobbe J.

Can you picture yourself knitting in Bobbe’s garden while enjoying this setting? Doesn’t her garden look beautiful, inviting and calming? I wanna be there! Thank YOU so much for sharing, Bobbe.

A closer shot of Purple Hyacinth Bean Vine in Bobbe's garden - photo credit Bobbe J.
A closer shot of the Purple Hyacinth Bean Vine - photo credit Bobbe J.

If you missed the offer earlier this year, I now have Jackie and the Beanstalk Magic Seeds (a.k.a. purple hyacinth bean vine) available for purchase. You too can grow lovely flowering vines like this, and I hope you will!

p.s. The reason Bobbe mentioned “No Eat Beans” is because I included a caution on my seed packets about the raw beans being poisonous to eat. Apparently if they are cooked well, they are ok to eat. But why take a chance? At least I have never done that so wouldn’t want to suggest it to someone else. I just enjoy seeing the vines with their beautiful dainty pink flowers and brilliant pods.

Related Images:

What size beads do you have?

Have you acquired some seed beads and you are not sure if they are the size you need for a HeartStrings pattern? You don’t need fancy tools, calipers or such, to find out. As a knitter, it is likely that you already have a knitting needle gauge. That’s all you need for determining what size beads you have. Here’s how —

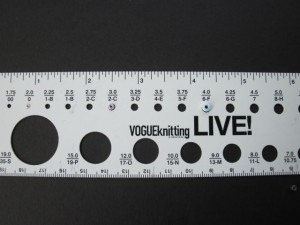
Using your knitting needle gauge, find the closest hole that matches one of your round beads as shown in the following picture. The mm sizing on your knitting needle gauge is either exactly, or close to, the diameter of the beads you have. In this picture, I demonstrate with 3 different size beads that are commonly used in HeartStrings beaded knitting patterns.

Using a knitting needle gauge to determine bead size
Use a knitting needle gauge to determine bead size (click to enlarge picture because I know it might be difficult to see the beads, especially the smallest one!)

Looking at the largest to the smallest of the 3 beads in the picture, we have these diameters (and I’ll also go ahead and give you an alternative common specification that you are likely to see when shopping for beads):

  • 4 mm diameter = size 6/0 seed bead
  • 3 mm diameter = size 8/0 seed bead
  • 2 mm diameter = size 11/0 seed bead

I hope this helps you confidently proceed with using beads you have on hand, or when shopping to know what you are getting.

In case you had not seen yet, here are also some of my other bead information resources, such as estimates of number of beads per gram (really helpful since almost all beads are sold by grams rather than number of beads).

Happy knitting and beading!

p.s. If you love sheep-y things as much as I do, you’ll love seeing this cute Sheep Needle Gauge designed by Susan Pine, the Elegant Knitter at Goose Pond.

Related Images:

The Mathematics of Long Tail Cast On

People sometimes ask what my favorite cast on is. Out of all the many cast on methods I know and sometimes use (and would specify in my HeartStrings patterns if I used something special), the Long Tail Cast On is my work horse – i.e. the default cast on I use unless there is a reason to use something else.

If you need a refresher about what the Long Tail Cast On is, or how it is done, here is a tutorial at KnitPicks.

Since the premise of Long Tail Cast On is to leave a yarn tail long enough to cast on all the stitches you want, a good skill to know is how much tail to leave. Especially if needing to cast on a LOT of stitches, it is quite frustrating to have to join in another length of yarn (and therefore have 2 extra yarn ends to weave in later). The other end of the spectrum is to leave way too much, and that can potentially be wasteful especially with high-priced yarn. So, like Goldilocks and the Three Bears, the “porridge that is just right” is starting out with a tail that is long enough to complete casting on all stitches plus some extra for weaving in later.

A Rule of Thumb for Standard Gauges

The relatively well-known rule of  thumb is to leave a tail that is 3 times the width of the knitting plus a few inches to secure into the knitting later by weaving in.

This works pretty well when you are knitting standard fabric gauges such as for sweaters. But can start getting off when the gauge is firmer (e.g. socks) or looser (e.g. lace shawls).

Another big consideration in socks and lace is that a supple and loose cast on is required for optimum expansion (e.g. the top of sock cuffs, or when blocking lace). So this rule of thumb might give you a too short estimate. Maybe, maybe not, but I want to offer another calculation that is almost as easy, and that at least you can consider so that maybe you won’t be frustrated by a too-short long tail after getting almost to the end of casting on a zillion stitches.

An Observation

One way that many knitters try to rectify the problem of a too-tight beginning edge is to cast on over two needles, or cast on using a larger needle. You can get by with this method, as long as the yarn used will re-distribute itself into spaces between the stitches when stretched row-wise. Otherwise, you will just get a sloppy extra-high first row of stitches, with a still too-tight cast on.

And it hardly will ever work with Long Tail Cast On, because even if the ball-end yarn loops will re-distribute and stretch out, the long tail end is already elongated along the bottom edge and constrains the widthwise stretch.

A commonly overlooked fact is that the distance between the stitches of the cast-on row is a big determinant in whether there is enough looseness in the cast on edge to stretch similarly to the rest of the knitting. Of course, you don’t want your cast on edge to be so widely spaced that it is sloppy looking either. A good test is that you should be able to fully insert a knitting needle of the same size between any two cast on stitches. If you keep this is mind, you will soon get to the point of automatically “knowing” to leave enough distance between each cast on stitch. Please don’t tell me it is impossible to use the easy work-horse Long Tail Cast On for lace — I’ve been successfully doing it or decades and want to help you learn to love it, too (if you want to).

An Easy Long Tail Calculation Based on Number of Stitches and Needle Size

Now back to knowing how much of a long tail to leave for casting on. (this of course assumes standard practice of working the long tail with your thumb for the closed edge loops of the cast on, and the ball-end of the yarn is being worked over your forefinger for the stitches that are placed on the knitting needle)

Long tail length (in inches based on mm needle size):

[ (Number of stitches) * (mm needle size) / 8 ] + some extra for weaving in later

For example, the Peek-a-Bead Scarf is 43 stitches on US 6 / 4 mm needles, so the calculation is [43 * 4 / 8] = 21.5″ + some extra for weaving in later

Note: For those using metric, convert by a factor of 2.54 cm per inch; i.e. 2.54 * 21.5 = 54.5 cm for the above example.

What’s Behind All This?

It’s that amazing thing called PI, a mathematical wonder. PI times the diameter of a needle is the circumference around which the yarn travels. So I’ve used that trajectory of the yarn’s path, simplified a bit for ease of use (but still should be plenty accurate enough), and voilà — a way you can calculate your long tail yarn length based on number of stitches and needle size.

Related Images:
Knitting for Christmas in July

Christmas in July! Goodness knows, with all this summer’s heat, day-dreaming about snow while knitting projects for winter holidays is a bit of a welcome reprieve.

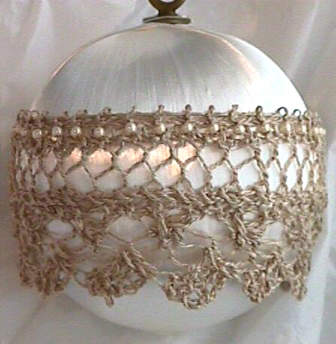
Every year at Christmas time, I say that the next year I am going to start doing my gift projects earlier. So this year I am finally doing better because there are 2000+ Bits of Lace knitting members who are keeping me at my word for this month’s project at KnitHeartStrings.com. The project is the Satin and Lace Ornament and the pattern is free when you are subscribed to the HeartStrings newsletter and you register for free content at the member website).

So if you are looking for an idea to celebrate Christmas in July, com’ on and join us.

Satin and Lace Ornament


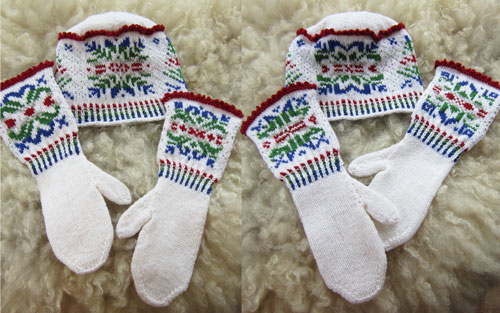
Yes, I know that you usually see me doing lace and beads. But I do like all forms of knitting. I finally got around to writing the pattern for No Two Alike Snowflakes. I had designed the original hat and mittens set in a 4-year old child size as a guild project for the Christmas tree in the Blue Room of the White House (1998).

Ever since then, I have had requests to publish the pattern for these. And (finally) I have done that and the pattern is available. If you have been waiting, thank you for your patience!

No Two Alike Snowflakes

The set features Fair Isle stranded knitting in 4 colors against a snowy solid white background. Just as real snowflakes are each different and unique, each snowflake in this set is a different design motif (and thus the name I decided on for this pattern)!

The published pattern expands the sizing to Child S thru Adult XL. I also changed the thumb on the mittens to a gusset style vs. the Latvian style of the original, as I felt a gusset is more comfortable for adult sizes (and works equally well for child sizes).  The knitting is done in-the-round with no seams to sew.

Picot trim is a fancy bind off technique used for both the tip-to-cuff mittens and the bottom-up hat. I hope you enjoy  the “secret” used to make the red picot trim at the upper edge of the hat band, even though the crown continues from there in a seamless construction.

The pictured sample models for the published pattern were knit in size adult medium using KnitPicks Wool of the Andes. The pattern is available in downloadable pdf format from HeartStrings pattern sites such as Ravelry, Shopatron, Patternfish, etc.. It is also now also available thru the KnitPicks Independent Designers listing at their website). Printed patterns will be available in shops this coming Fall.

Are you doing anything for Christmas in July? Doesn’t matter whether it is knitting or not, I’d love to hear about it.

Related Images:

Ravelry currency conversion for Paypal payments

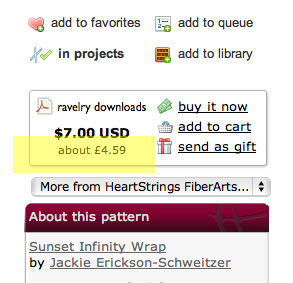
Fans all over the world can conveniently purchase my HeartStrings downloadable patterns from Ravelry using Paypal. Convenient currency conversion allows you to see the price in your own currency before buying.

Since I am a U.S. business, my patterns are priced on Ravelry in US$’s. Even if you are not familiar with conversion rates into your own currency, Ravelry’s Super-Star-Programmer Casey has made this easy for all of us!

Did you know that if you have your country location in your Ravelry profile, it will show you the price conversion in your currency? For example, if you are in UK and look at a pattern priced in US$’s, you can see the conversion into pounds right below it. There’s no extra work on your part when paying either, because PayPal takes care of all that automatically for you.

Here is a visual example of the way that Ravelry shows the currency conversion on a pattern page. I highlighted the area that shows the price conversion into pounds so it will be easier for you to see and know where to look. Of course, if you are in another country other than the UK., then the conversion shown would be in your currency for your country. (But remember, you have to have the Country set in your Ravelry profile so that you get the conversion.)

Ravelry currency conversion for Paypal payments
Ravelry currency conversion for HeartStrings patterns purchased with Paypal - Try it out!

Check your Ravelry profile now and update if necessary so that you can take advantage of this neat Ravelry feature. Then try it out on some of my HeartStrings/Jackie E-S patterns in the Ravelry store.

Related Images: